Run the Workflow and observe retries
- Build the application
- Test and run a Worker
- Run and observe retries
With your Workflow, Activities, Worker, and tests in place, you'll now start the Workflow from a small client program. Then you'll explore the run in the Temporal Web UI and watch Temporal automatically retry an Activity when the network drops.
Run the Workflow from a client
You can start a Workflow Execution by using the Temporal CLI or by writing code using the Temporal SDK.
Starting a Workflow Execution using the Temporal SDK involves connecting to the Temporal Server, configuring the Task Queue the Workflow should use, and starting the Workflow with the input parameters it expects. In a real application, you may invoke this code when someone submits a form, presses a button, or visits a certain URL. In this tutorial, you will create a small CLI program that runs your Temporal Workflow.
Create the file client.rb in the lib directory:
touch lib/client.rb
Open client.rb in your editor and add the following code to the file to connect to the server and start the Workflow:
require_relative 'ip_geolocate'
require 'temporalio/client'

name = ARGV[0]
unless name
  puts "Please provide your name when running the program."
  exit 1
end

# Create a client
begin
  client = Temporalio::Client.connect('localhost:7233', 'default')
rescue StandardError => e
  puts e.message
  exit 1
end

# Run workflow
result = client.execute_workflow(
  IPGeolocate::GetAddressFromIPWorkflow,
  name, # This is the input to the workflow
  id: 'my-workflow-id',
  task_queue: IPGeolocate::TASK_QUEUE_NAME,
)

puts result
The program checks that at least one argument was passed and captures the user's name from ARGV.
The client sets up a connection to your Temporal Server, invokes your Workflow, passes in an argument for the name, and assigns the Workflow a unique identifier. The client dispatches the Workflow on the same Task Queue that the Worker is polling on. That's why you used a constant to ensure the Task Queue name is consistent. If there's a mismatch, your Workflow will execute on a different Task Queue and there won't be any Workers polling for tasks.
A Workflow ID is unique in a Namespace and identifies a Workflow Execution. Using an identifier that reflects some business process or entity is a good practice. For example, you might use a customer identifier as part of the Workflow Id if you run one Workflow per customer. This would make it easier to find all Workflow Executions related to that customer later.
Now you can run your Workflow. First, ensure that your local Temporal Service is running, and that your Worker program is running also.
Then open a new terminal and switch to the project directory:
cd temporal-ip-geolocation
Now run the following command to run the Workflow using the client program you wrote:
bundle exec ruby lib/client.rb Angela
You'll see the following output:
Hello, Angela. Your IP is 204.148.195.242 and you are located in Washington, District of Columbia, United States.
To run your Temporal Application, you need to start the Workflow and the Worker. You can start these in any order, but you'll need to run each command from a separate terminal window, as the Worker needs to be constantly running to look for tasks to execute.
Your Temporal Application works. Now review it in the Temporal Web UI.
Exploring your application in the Web UI
The Temporal Web UI gives you insights into your Workflow's execution. Open the Temporal Web UI by visiting http://localhost:8233 and click on your completed Workflow to view the execution history. You'll see results similar to the following image:
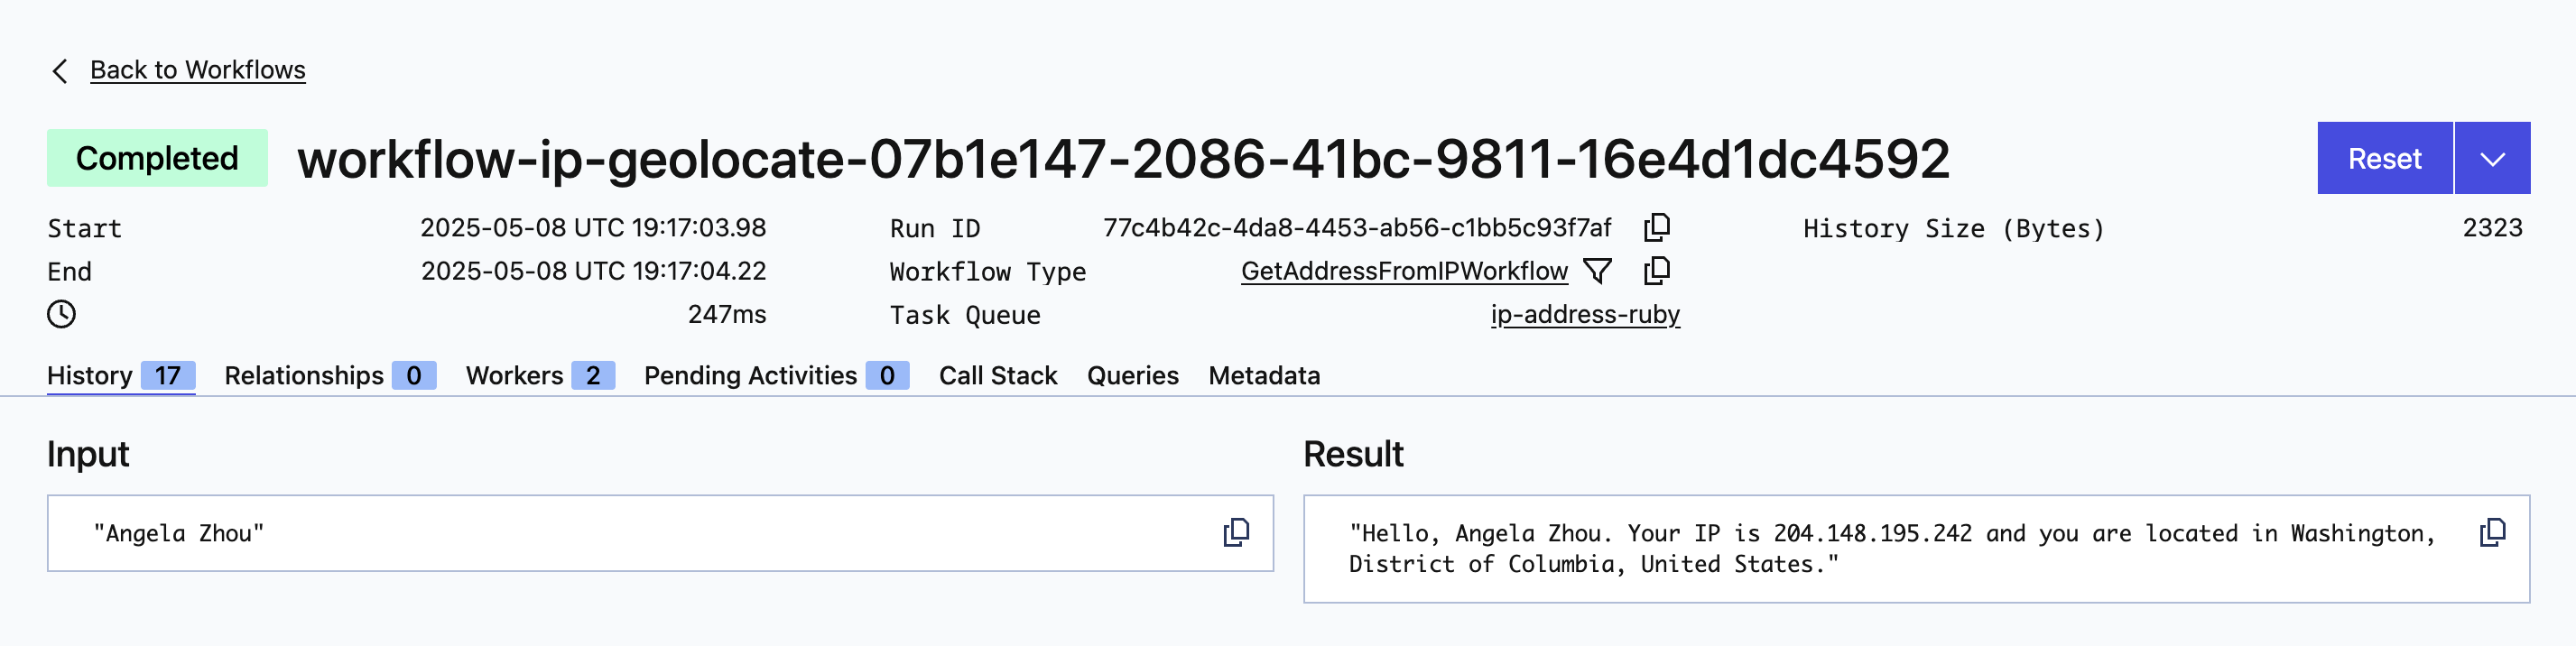
You'll see the dates the Workflow Execution ran, how long it took to run, the input to the Workflow, and the result.
After that, you see the Event History, detailing the entire flow, including the inputs and outputs of the Activity Executions:
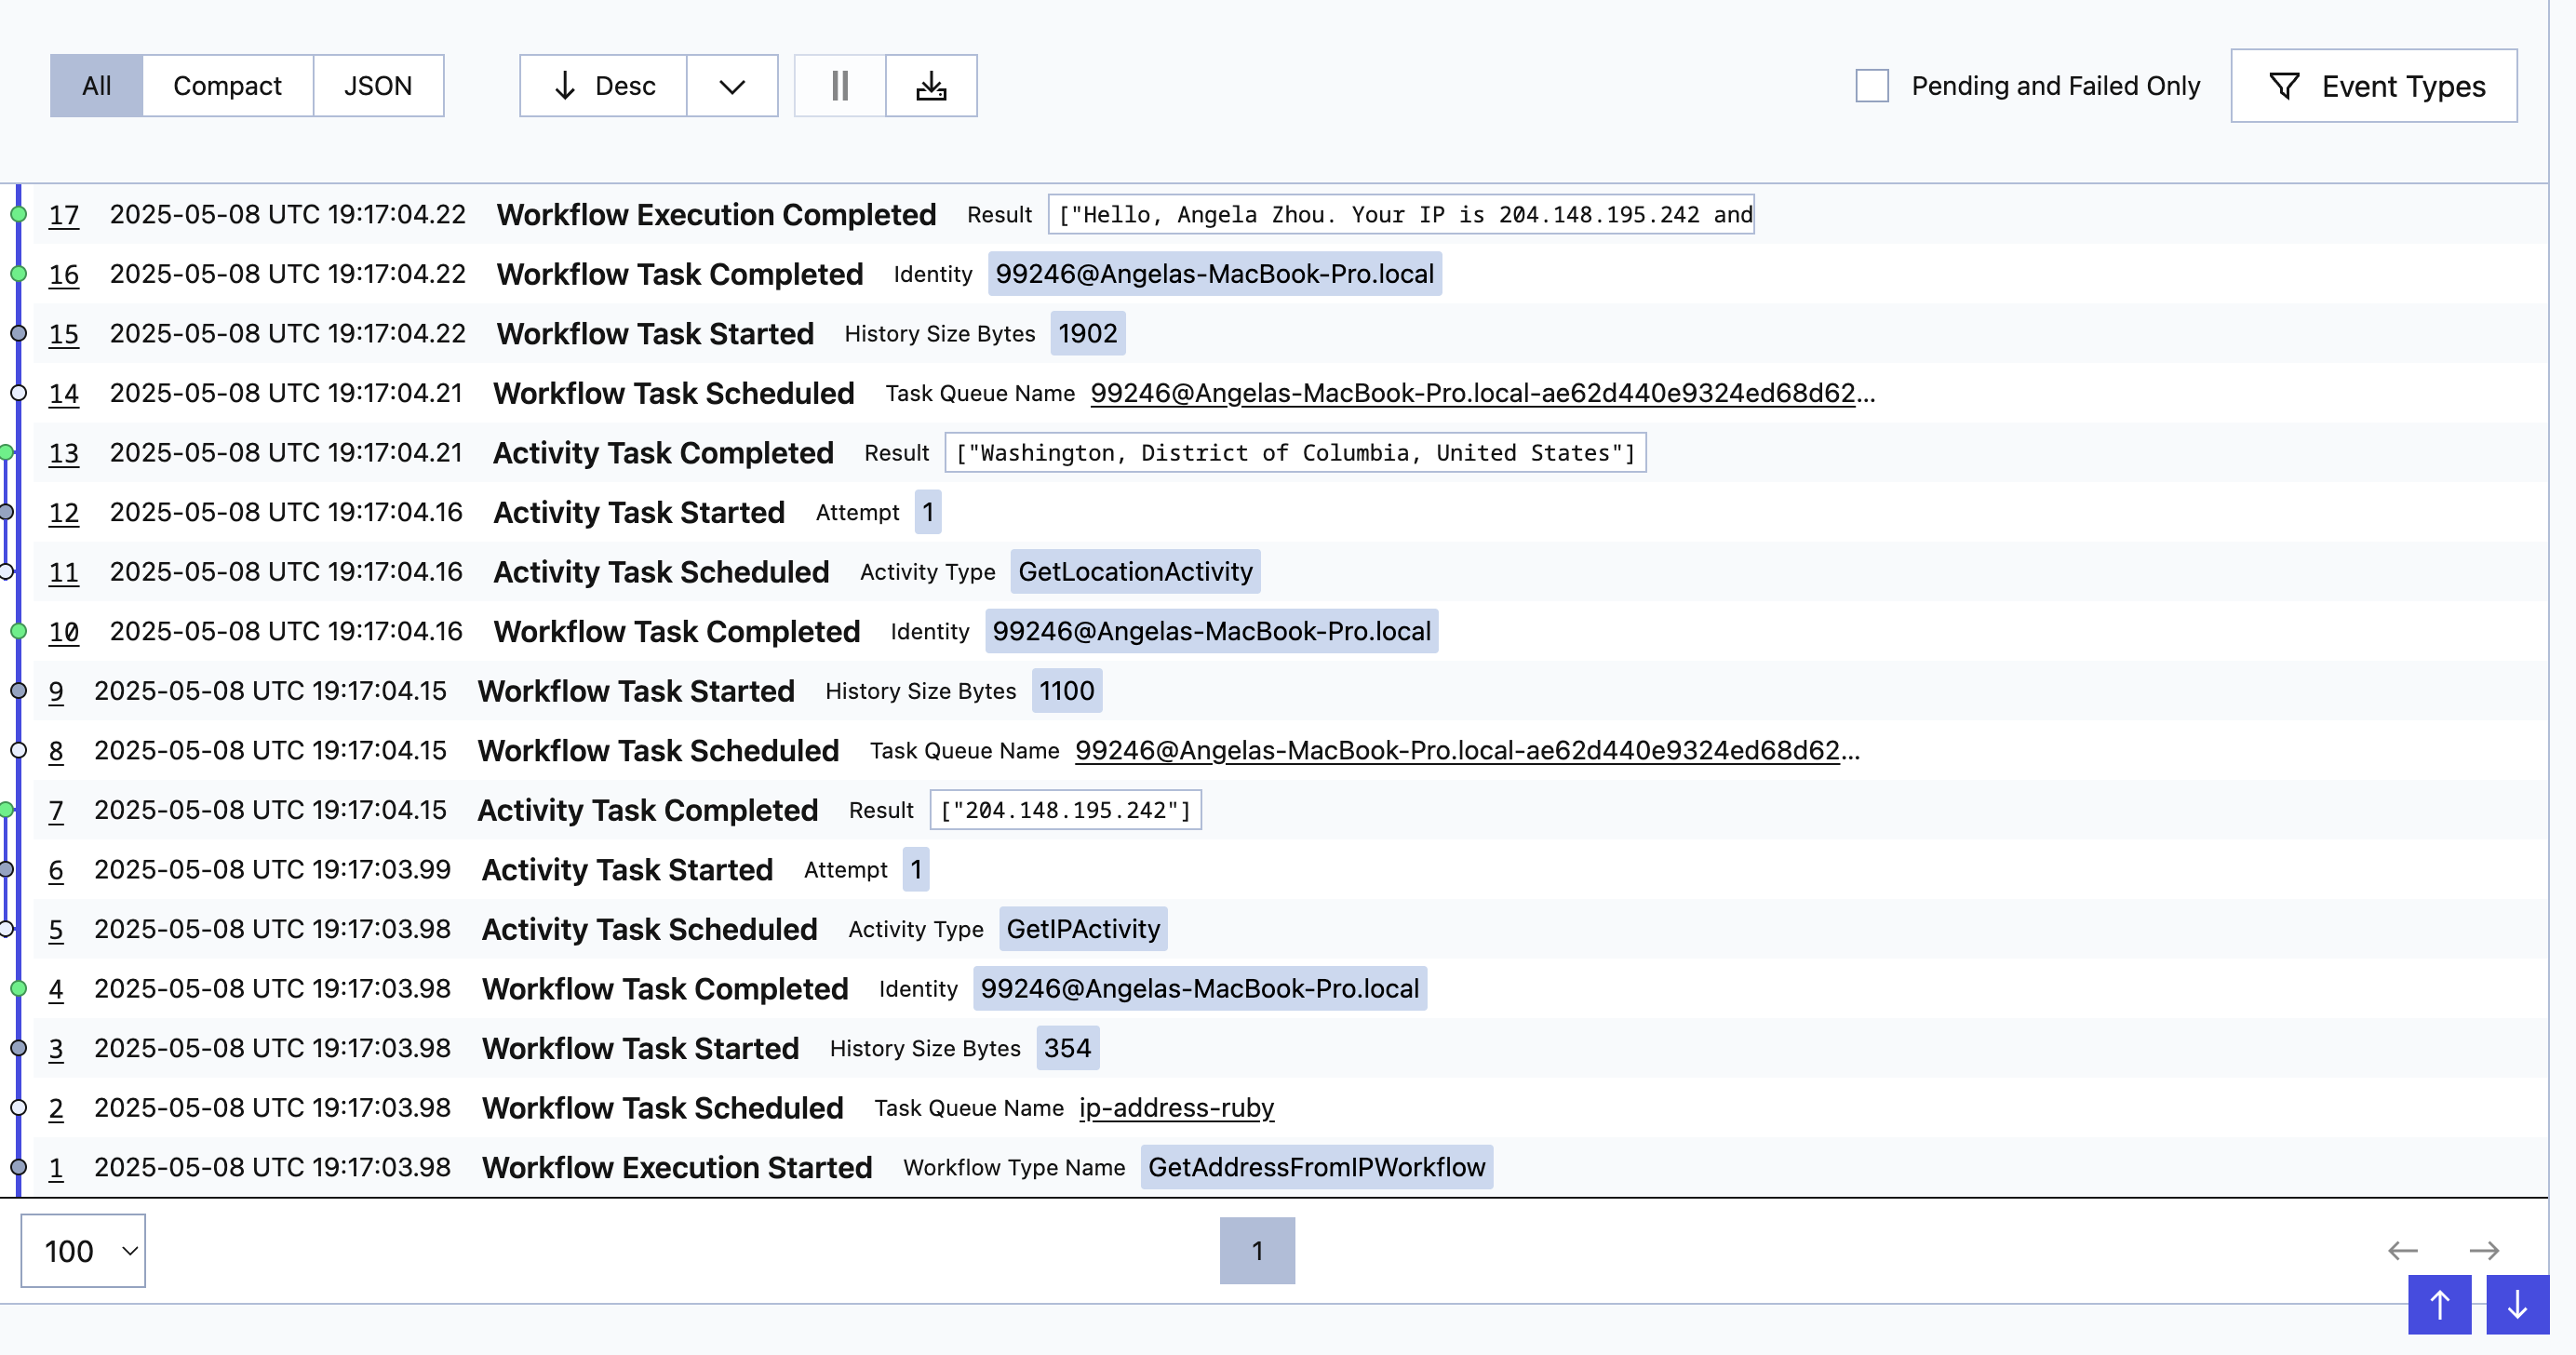
The most recent event is at the top, so read the history from the bottom up to see each step in the process. Using this history, you can see exactly how your Workflow executed and pinpoint any places things might have gone wrong.
Temporal stores the results of each Activity in this history, as you can see in the image. If there was a system crash between the GetIPActivity and GetLocationActivity Activity Executions, a new Worker would re-run the Workflow, but would use the previous Event History to reconstruct the Workflow's state. Instead of re-running GetIPActivity, it would use the previous run's value and continue on. This prevents duplicate executions. By relying on the stored Event History, Temporal ensures that the Workflow can recover seamlessly, maintaining reliability and consistency even after a crash.
In this application, this recovery isn't crucial. But imagine a situation where each Activity execution was a bank transaction. If a crash occurred between transactions, the Worker can pick up where the previous one failed. Nobody gets charged multiple times because something failed.
Next, you'll explore how Temporal handles failed Activities.
Observe automatic retries
When you developed your Activities, you didn't include any error-handling code. So if there's a problem making the request, the Workflow will handle the error using the Retry Policy.
Test this out. Disconnect your local machine from the Internet by turning off your Wi-Fi connection or unplugging your network cable.
Then, with the local Temporal Service running and your Worker running, switch to the terminal window where you ran your Workflow and run it again:
bundle exec ruby lib/client.rb Angela
This time you don't get a response.
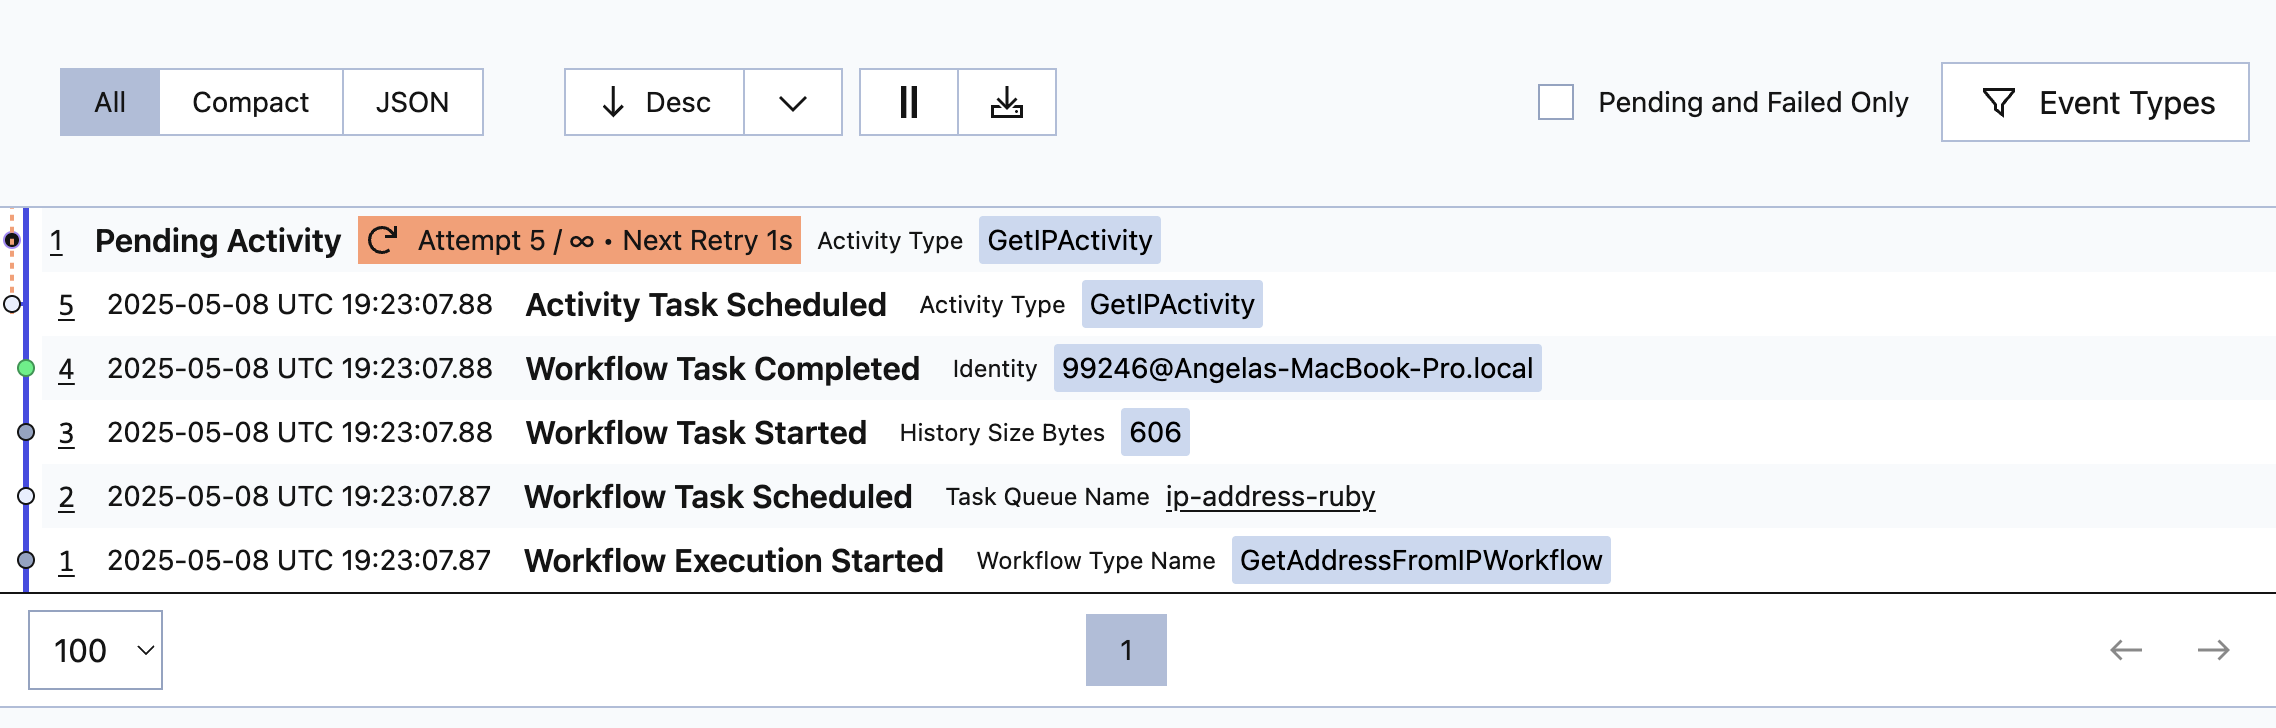
Visit http://localhost:8233 to open the Temporal Web UI and locate the Workflow Execution that's currently running. When you select it, you'll see something like the following image, indicating that there's a problem:
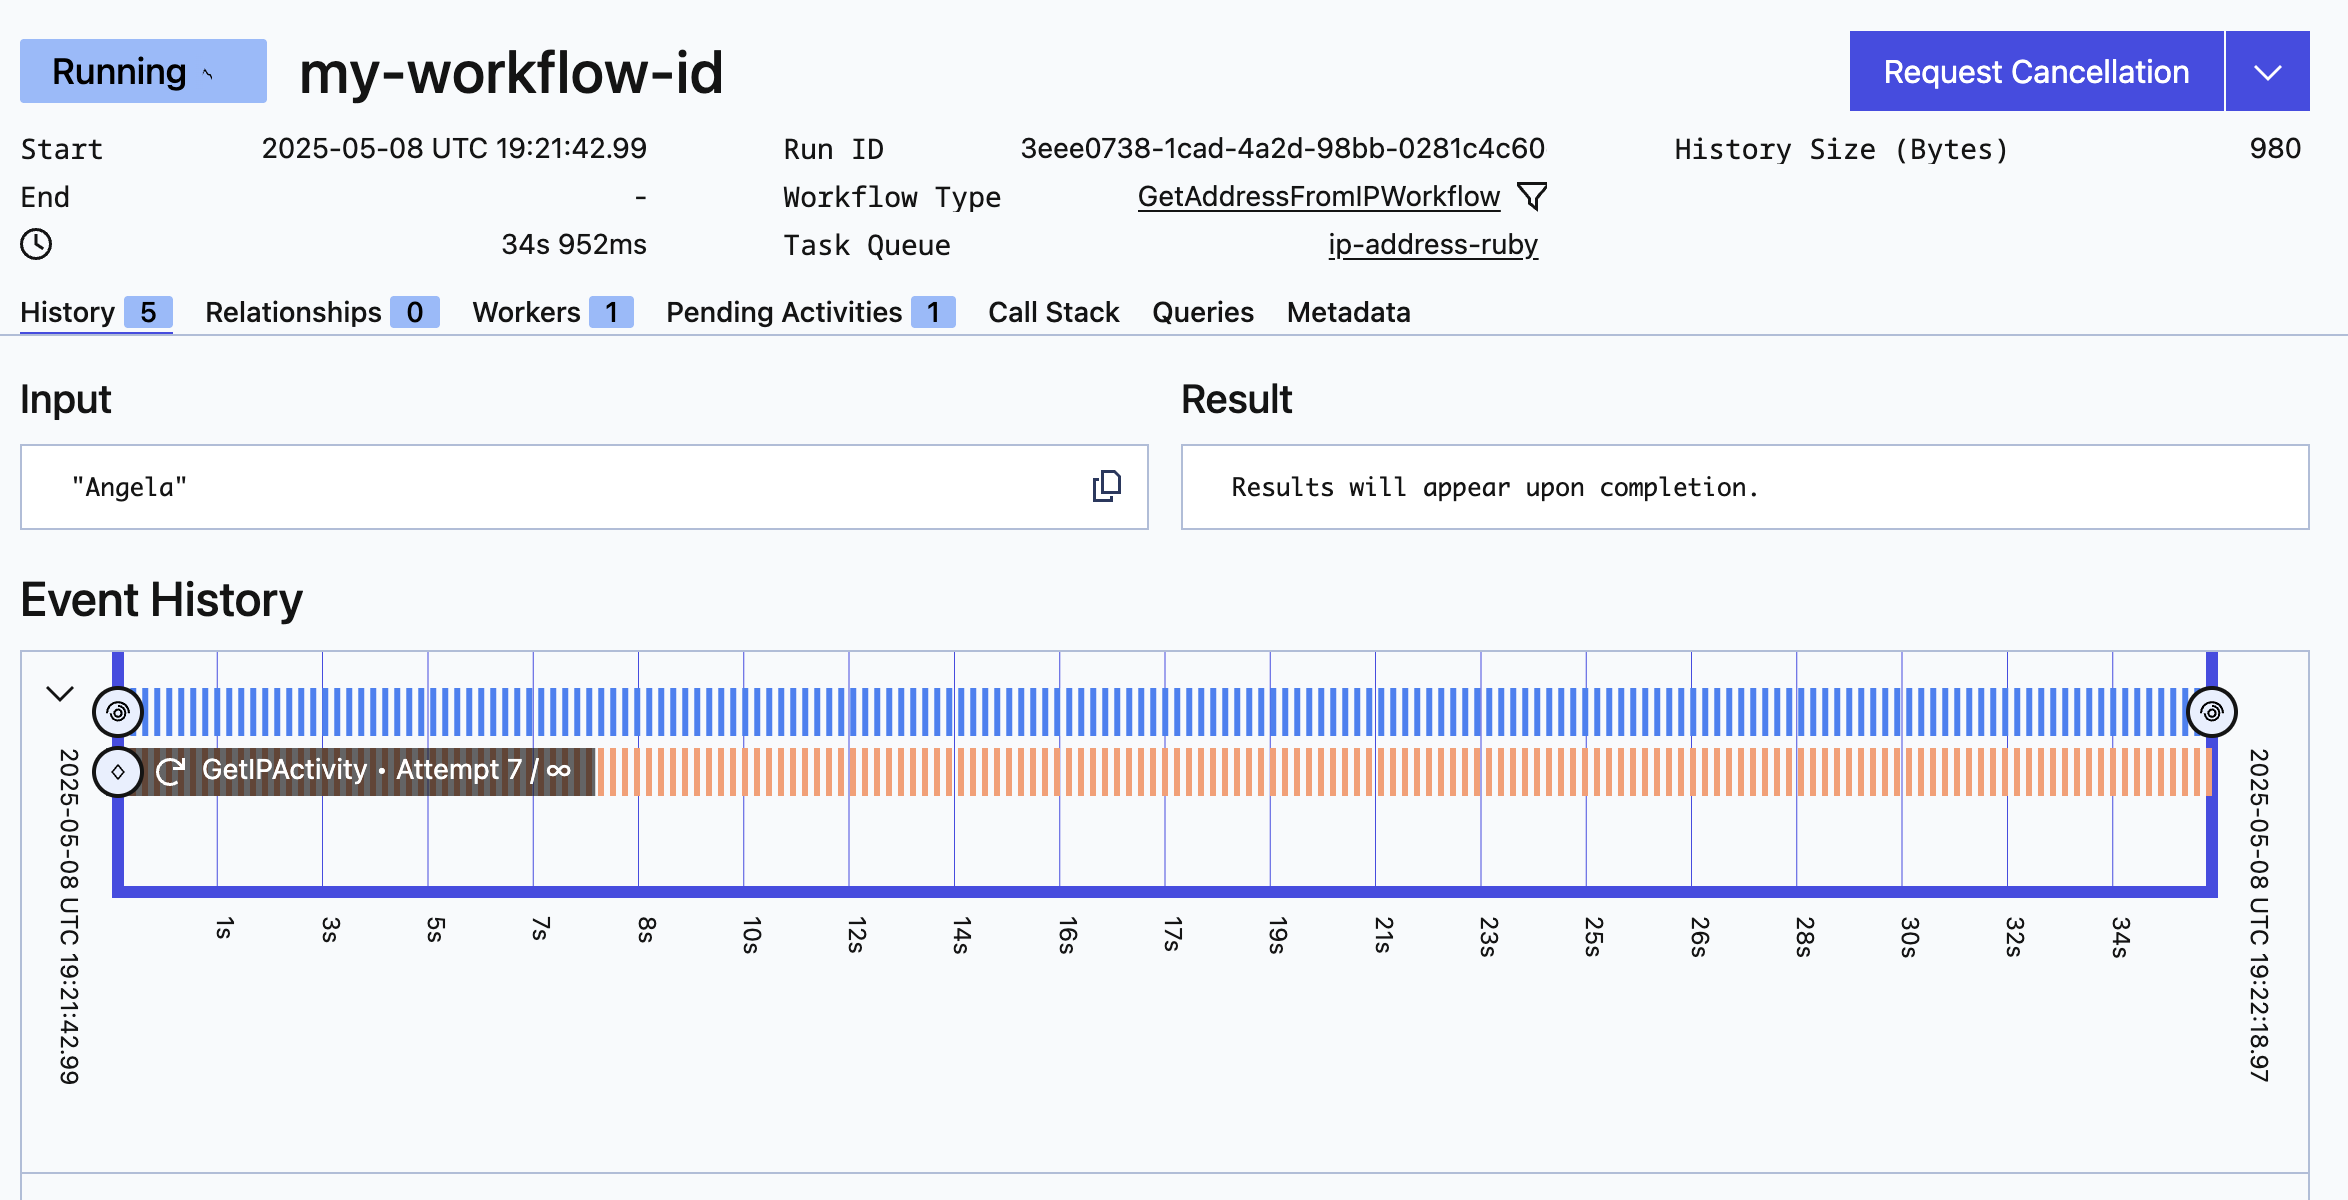
As you can see, the GetIPActivity Activity has failed and Temporal is retrying it. Scroll down to the Event History and you'll see the failure represented there:
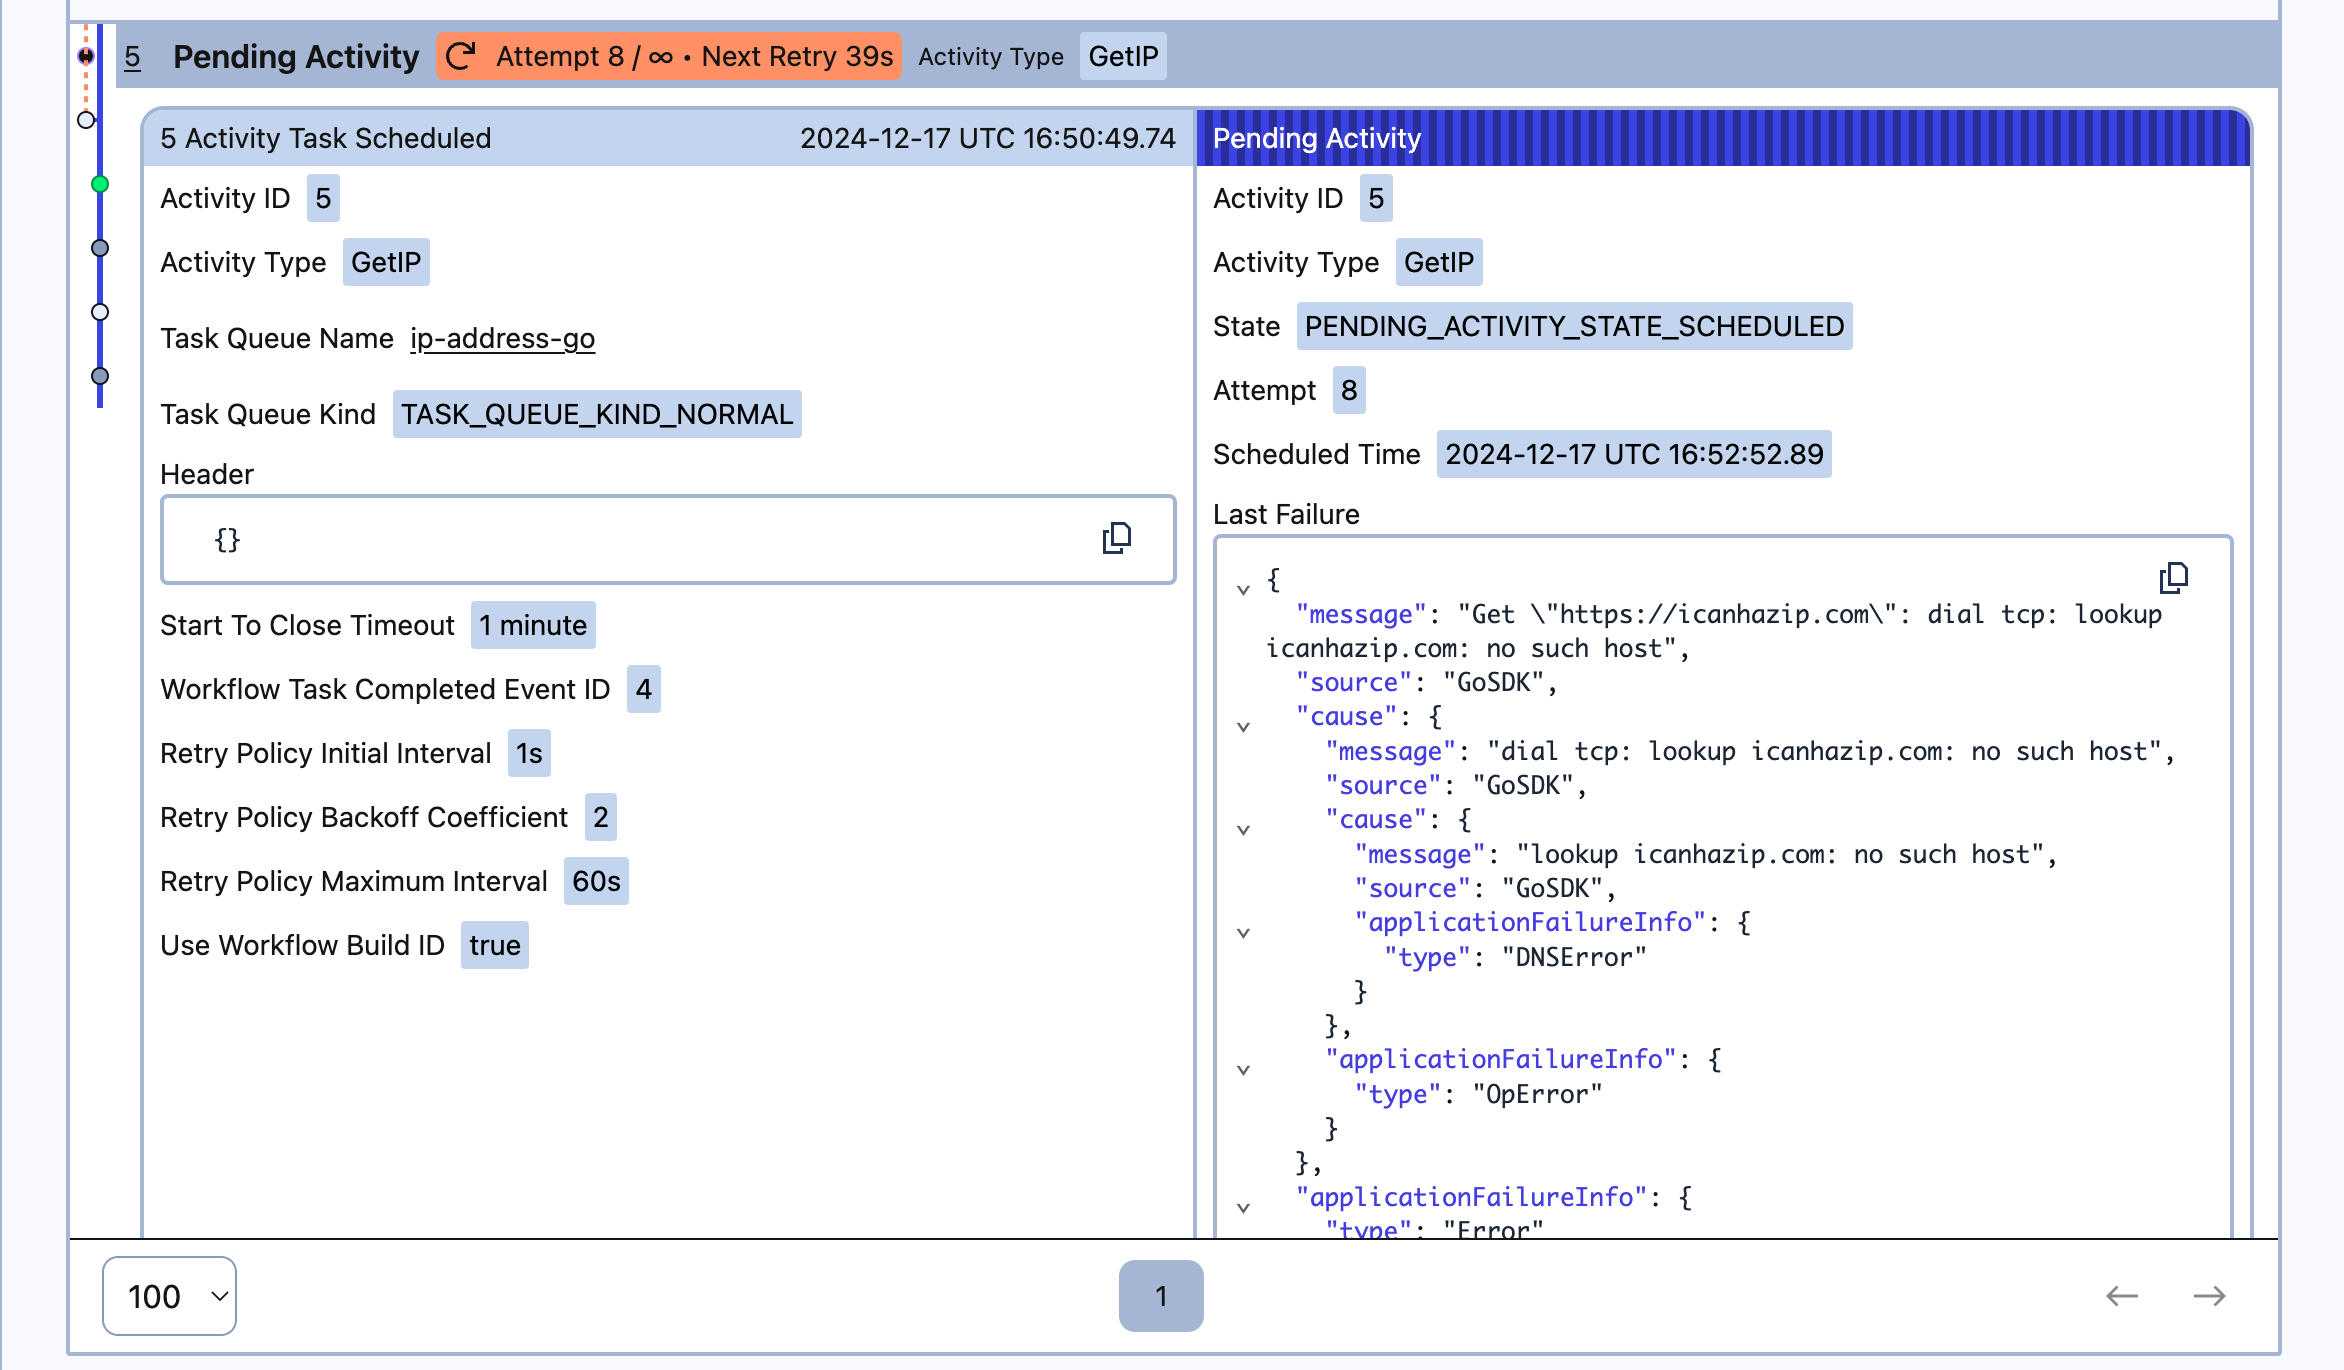
Select the Pending Activity item in the table to see why it failed and you'll see the stack trace:
Connect to the internet again and wait. After a few moments, the Workflow recovers and completes:
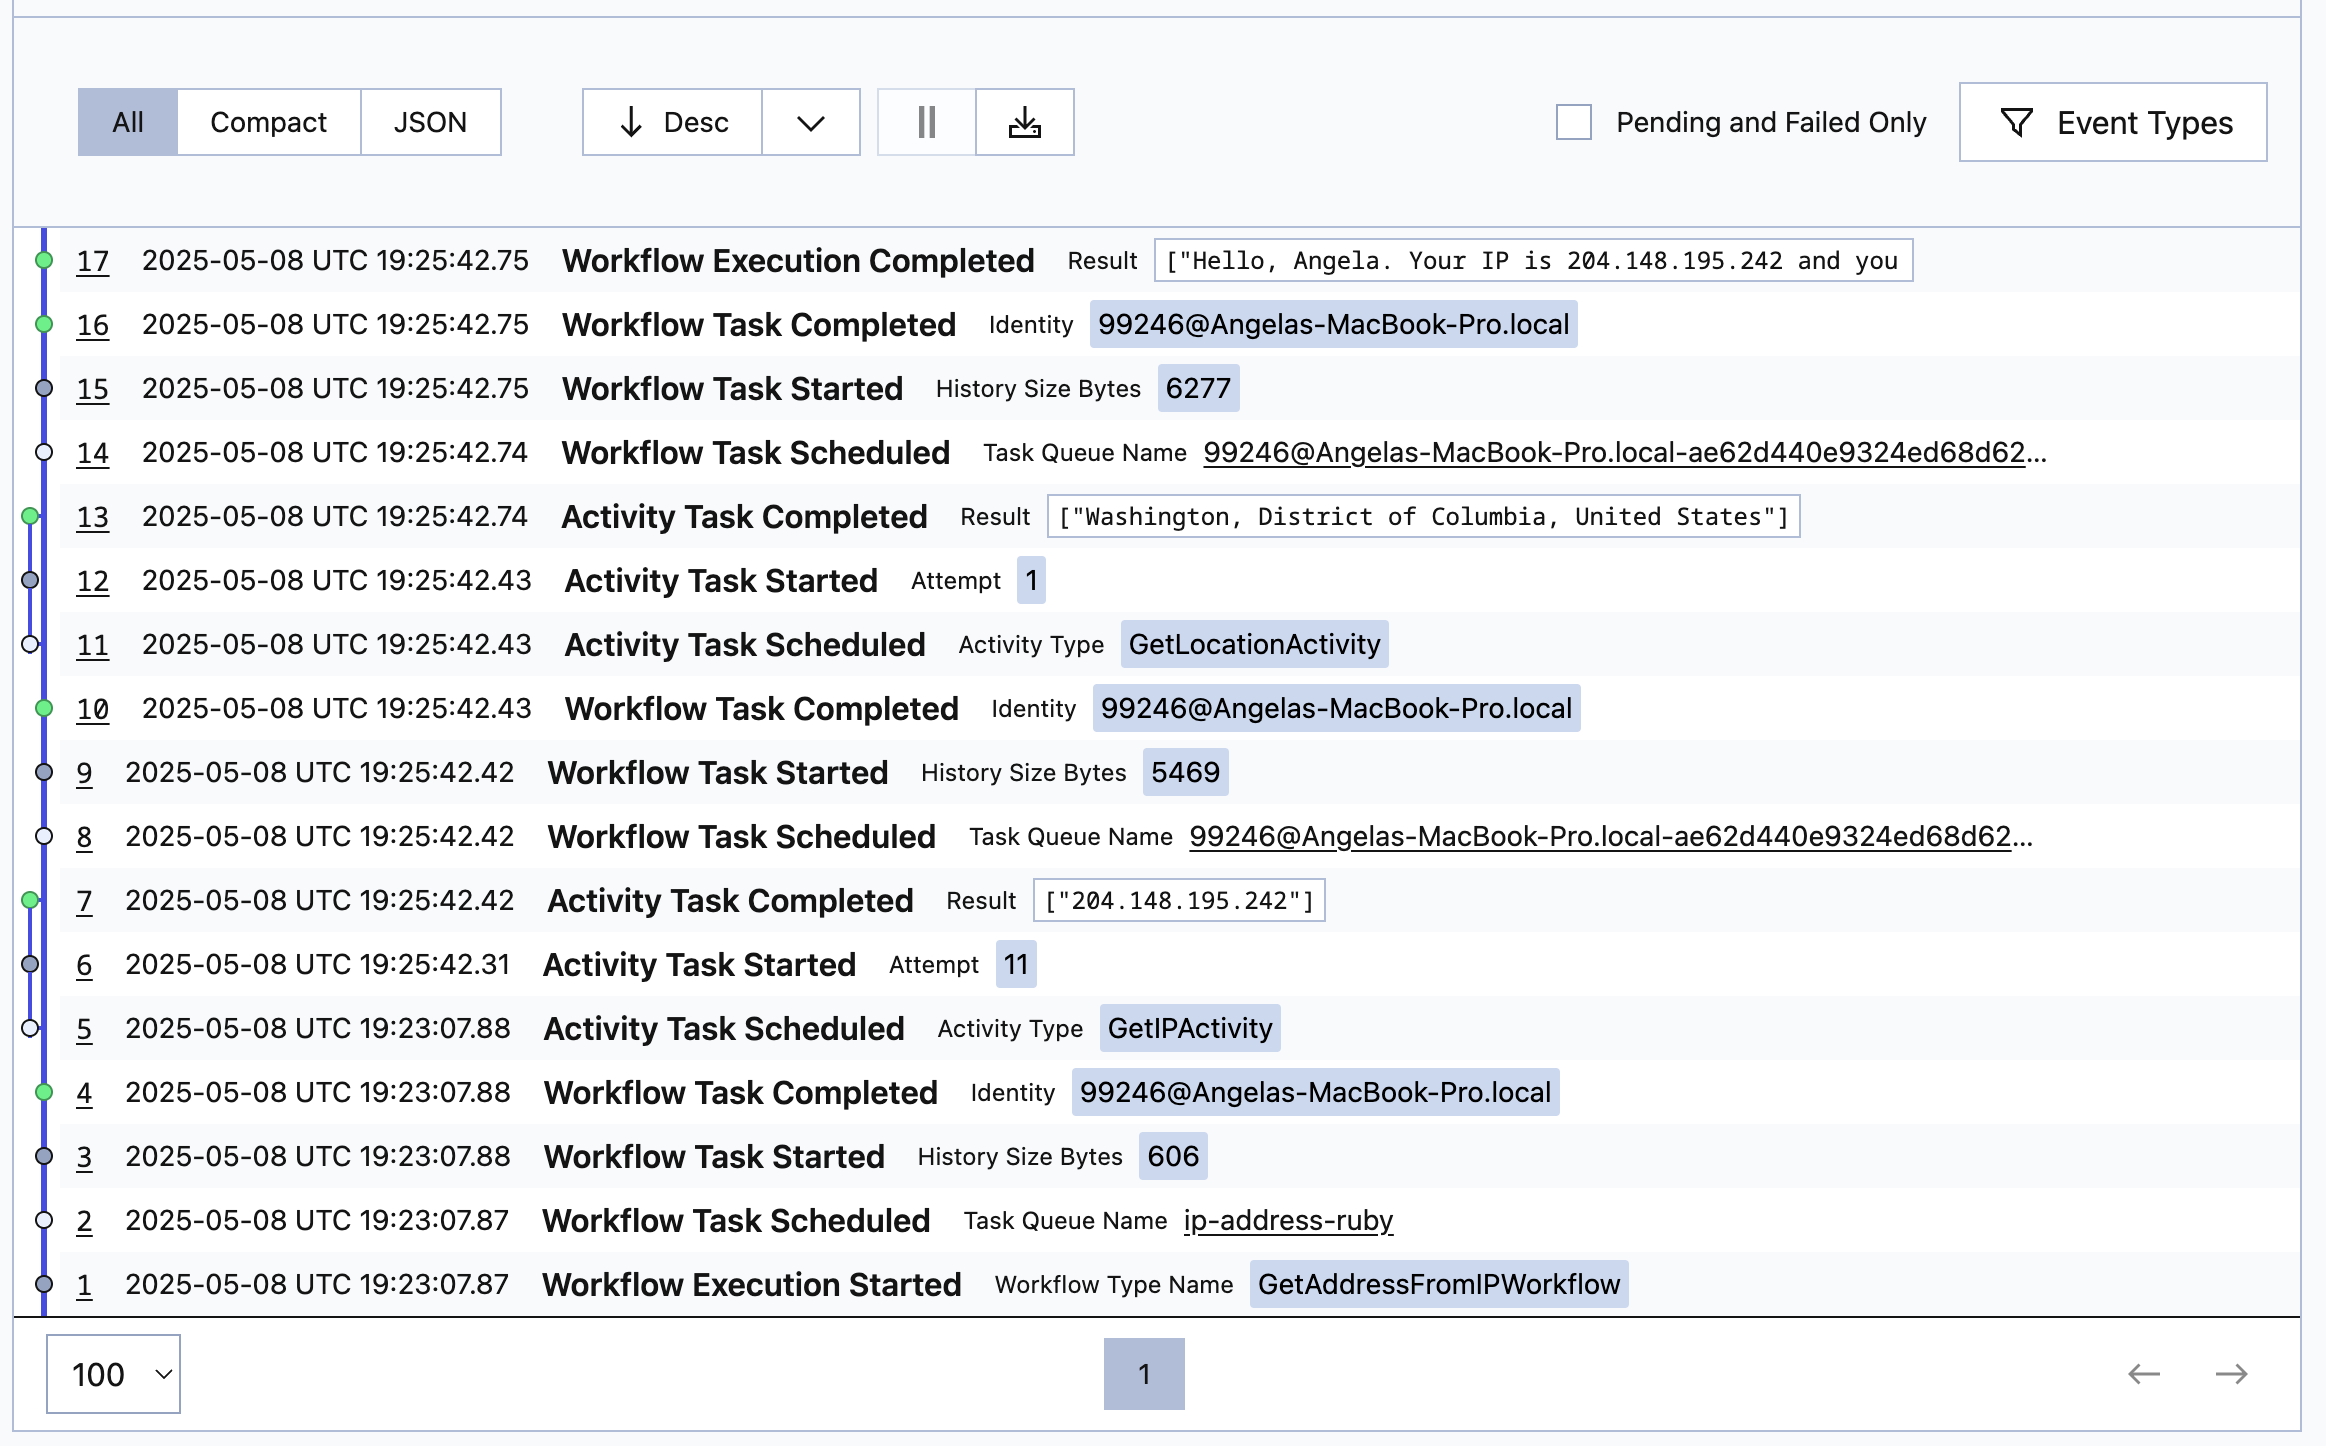
If you return to your terminal where you launched the Workflow, you'll find your results there as well.
You can recover from failures by letting Temporal handle them for you instead of writing complex error-handling logic. You can also decide that you only want to retry a fixed number of times, or that you only want to recover on certain kinds of errors.
Conclusion
In this tutorial you built your first Temporal Application from scratch. You used the Temporal Ruby SDK to build a resilient application that recovered from failure. You wrote tests to verify that it works and reviewed the Event History for a working execution. You also tested your Workflow without an internet connection to understand how Temporal recovers from failures like network outages.
Take this application one step further and add a new Activity that gets the current weather for the location you found.
What's next?
Get notified when we launch new educational content
New courses, tutorials, and learning resources - straight to your inbox.