Deploy a TypeScript Slack App to DigitalOcean using Temporal Cloud
- Build the app
- Deploy to production
When you are ready to deploy your TypeScript Slack App to production, you need a server to host it. You also need to connect to a Temporal Service to orchestrate and supervise your Temporal Application. In production you'll want a Temporal Service that can handle scale, like Temporal Cloud.
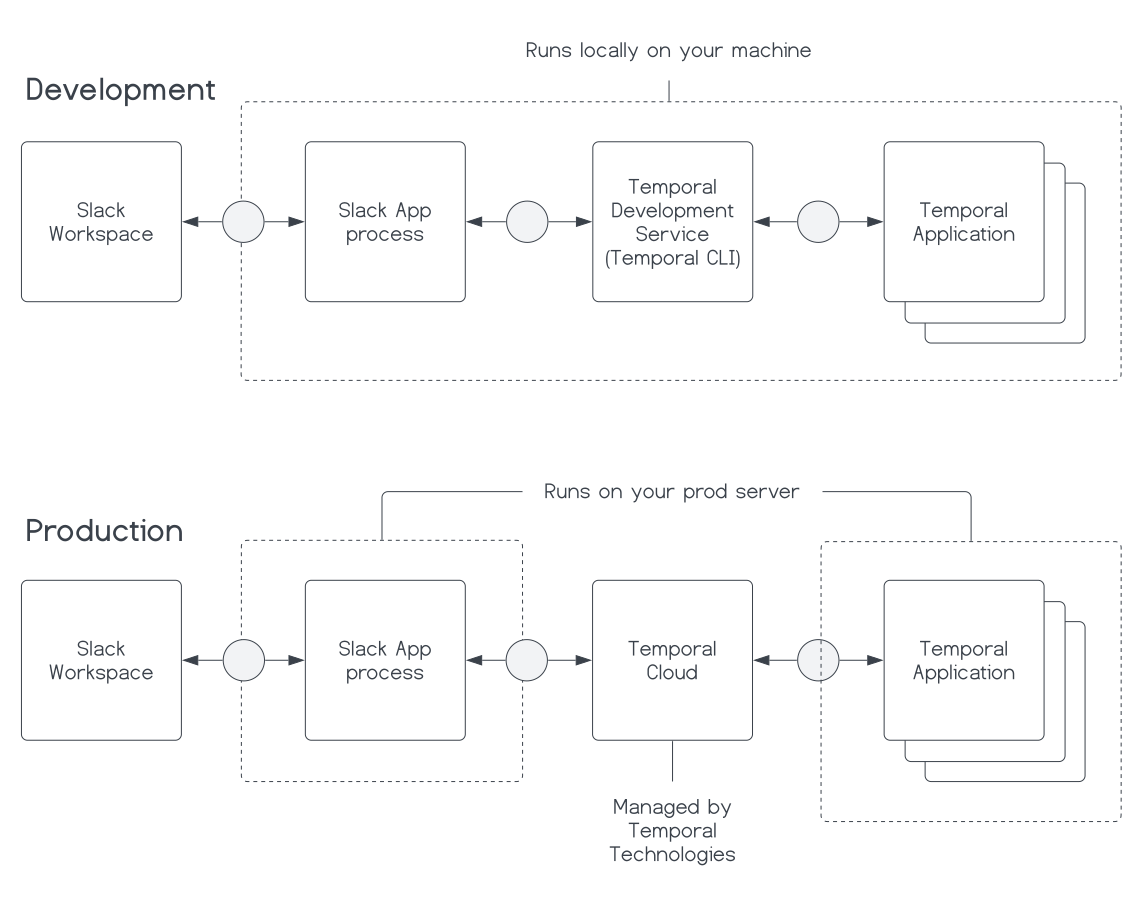
DigitalOcean provides flexible Cloud servers called Droplets that you can use to host your Slack bot and Temporal Application. In this tutorial you'll deploy your Temporal-backed Slack App to a DigitalOcean Droplet while using Temporal Cloud as your orchestrator.
Prerequisites
- Complete the Build a Work Queue Slack App with TypeScript and Temporal tutorial.
- A DigitalOcean account to create a Droplet.
- A domain name (you need a valid SSL certificate for the Temporal Application to communicate with Temporal Cloud).
- A Temporal Cloud account from which to create a Namespace.
- A Temporal Cloud Namespace.
- A Temporal Cloud Namespace Certificate. You can use tcld to generate the certificate. Follow the steps to install tcld then the steps to generate a Temporal Cloud certificate.
Prepare your app for Temporal Cloud
Update each of your .env files with your Temporal Cloud credentials so you can test locally with Temporal Cloud. Add your PEM (certificate), Private Key, Temporal Address, and Temporal Cloud Namespace:
TEMPORAL_CLOUD_ADDRESS="<your-temporal-cloud-address>"
TEMPORAL_CLOUD_NAMESPACE="<your-temporal-cloud-namespace>"
# Note that you will want to retain the multiline format for the PEM and Private Key
TEMPORAL_CLOUD_PEM="<your-temoral-cloud-namespace-pem>"
TEMPORAL_CLOUD_PRIVATE_KEY="<your-temporal-cloud-namespace-key>"
Then, update your code to use Temporal Cloud. Connecting to Temporal Cloud requires a few changes to your Temporal Client and Worker. When developing locally, your Temporal Client looks like this:
import 'dotenv/config';
import { Client, Connection } from '@temporalio/client';

export let temporalClient: Client;

export async function initializeTemporalClient() {
  const connection = await Connection.connect();

  temporalClient = new Client({
    connection,
    namespace: process.env.TEMPORAL_DEV_NAMESPACE!,
  });
}
To use Temporal Cloud, change the Temporal Client code to read your Namespace certificate key and PEM env variables, and change the connection object to include the Namespace and certificate information:
import 'dotenv/config';
import { Client, Connection } from '@temporalio/client';

export let temporalClient: Client;

export async function initializeTemporalClient() {
  const key = Buffer.from(process.env.TEMPORAL_CLOUD_PRIVATE_KEY!, 'utf-8');
  const cert = Buffer.from(process.env.TEMPORAL_CLOUD_PEM!, 'utf-8');
  const address = process.env.TEMPORAL_CLOUD_ADDRESS!;
  const namespace = process.env.TEMPORAL_CLOUD_NAMESPACE!;
  const connection = await Connection.connect({
    address: address,
    tls: {
      clientCertPair: {
        crt: cert,
        key: key,
      },
    },
  });

  temporalClient = new Client({
    connection,
    namespace: namespace,
  });
}
Update the Temporal Worker. When developing locally:
import 'dotenv/config';
import { NativeConnection, Worker } from '@temporalio/worker';
import path from 'path';

async function run() {
  try {
    const worker = await Worker.create({
      namespace: process.env.TEMPORAL_DEV_NAMESPACE || '',
      workflowsPath: path.resolve(__dirname, './workflows'),
      taskQueue: `${process.env.ENV}-temporal-iq-task-queue`,
    });

    await worker.run();
  } catch (err) {
    console.error(err);
    process.exit(1);
  }
}

run();
To use Temporal Cloud, alter worker.ts:
import 'dotenv/config';
import { NativeConnection, Worker } from '@temporalio/worker';
import path from 'path';

async function run() {
  try {
    const key = Buffer.from(
      process.env.TEMPORAL_CLOUD_PRIVATE_KEY || '',
      'utf-8',
    );
    const cert = Buffer.from(process.env.TEMPORAL_CLOUD_PEM || '', 'utf-8');
    const connection = await NativeConnection.connect({
      address: process.env.TEMPORAL_CLOUD_ADDRESS || '',
      tls: {
        clientCertPair: {
          crt: cert,
          key: key,
        },
      },
    });

    const worker = await Worker.create({
      connection,
      namespace: process.env.TEMPORAL_CLOUD_NAMESPACE || '',
      workflowsPath: path.resolve(__dirname, './workflows'),
      taskQueue: `${process.env.ENV}-temporal-iq-task-queue`,
    });

    await worker.run();
  } catch (err) {
    console.error(err);
    process.exit(1);
  }
}

run();
Run your application locally to ensure it works with Temporal Cloud. If it does, move on to setting up your Droplet.
Create and set up Droplet
Create a new Droplet and choose the Ubuntu 20.04 image or Ubuntu 22.04 image. Once created, ensure the domain's A record points to the droplet's IP address.
Then set up:
- Configure SSH
- Install Node.js
- Install TypeScript and TS Node
- Set up Nginx as a reverse proxy
- Create a domain certificate
First, set up SSH following the Add SSH Key to Droplet tutorial. If you already have a private key on your local machine and need to force SSH to use the new key:
ssh -i ~/.ssh/id_rsa_digitalocean root@your-droplet-ip
Install Node.js. On Ubuntu:
sudo apt update
sudo apt install nodejs
This installs the newest stable version from Ubuntu sources. For different versions:
Install the typescript and ts-node packages globally:
sudo npm install -g typescript ts-node
We strongly recommend using Nginx as a reverse proxy. Node applications typically bind to localhost, so an Nginx reverse proxy isolates the application server from direct internet access. Follow these tutorials:
Use Let's Encrypt certbot to create a certificate for your domain:
Configure your Slack App on the Droplet
Using Git, clone the repo and install the dependencies:
git clone <your-repo>
cd <your-repo>/temporal-application
npm install
cd ..
cd <your-repo>/bot
npm install
If your repo is public these steps work as-is. If private, use an access token to clone the repo.
Since your .env files should be in your .gitignore, create new ones on the Droplet. Copy and paste the information from your local .env files into the respective files on the Droplet.
Now run your application on the Droplet. Start the slack bot and the Temporal Worker. Go to your Slack workspace and test your Slack App. If everything is running as expected, move on to starting everything with pm2.
Use pm2 to run your Worker
pm2 is a process manager for Node.js applications that ensures your TypeScript application runs continuously on your Droplet.
sudo npm install -g pm2
Change directory into your project and run your Temporal Worker with pm2:
pm2 start <your-app-entry>.ts --interpreter ts-node
Use the pm2 startup command to generate a script that will start pm2 on boot. This ensures your application starts if your Droplet restarts.
Review your application logs with the pm2 logs command.
Optional - Automate deployment with a shell script
Automate the deployment of your application to your Droplet by creating a shell script that clones your repo, installs dependencies, and starts your application with pm2:
#!/bin/bash

set -e

# The URL of your git repository
REPO_URL="https://github.com/<your-org>/<your-repo>"

# The directory you want to clone into
CLONE_DIR="your-workqueue-slack-app"

# Environment variables
SLACK_SIGNING_SECRET="<your-slack-signing-secret"
SLACK_BOT_TOKEN="<your-slack-bot-token>"
SLACK_APP_TOKEN="<your-slack-app-token>"
ENV="prod"
TEMPORAL_CLOUD_ADDRESS="<your-temporal-cloud-address>"
TEMPORAL_CLOUD_NAMESPACE="<your-temporal-cloud-namespace>"
# Note that you will want to retain the multiline format for the PEM and Private Key
TEMPORAL_CLOUD_PEM="<your-temoral-cloud-namespace-pem>"
TEMPORAL_CLOUD_PRIVATE_KEY="<your-temporal-cloud-namespace-key>"

# Remove directory if it exists
rm -rf $CLONE_DIR

# Clone the repository
git clone $REPO_URL $CLONE_DIR

# Kill all the current processes
pm2 kill

# Move into the temporal-application directory
cd $CLONE_DIR/temporal-application

# Create the .env file and populate it with the environment variables
echo "ENV=$ENV" > .env
echo "TEMPORAL_CLOUD_NAMESPACE=$TEMPORAL_CLOUD_NAMESPACE" >> .env
echo "TEMPORAL_CLOUD_ADDRESS=$TEMPORAL_CLOUD_ADDRESS" >> .env
echo "TEMPORAL_CLOUD_PEM=\"$TEMPORAL_CLOUD_PEM\"" >> .env
echo "TEMPORAL_CLOUD_PRIVATE_KEY=\"$TEMPORAL_CLOUD_PRIVATE_KEY\"" >> .env

npm install

pm2 start  ./api_server.js
# Sleep provides a delay to ensure the process is started before saving
sleep 1
pm2 save
sleep 1

cd ..

cd bot

# Create the .env file and populate it with the environment variables
echo "ENV=$ENV" > .env
echo "SLACK_SIGNING_SECRET=$SLACK_SIGNING_SECRET" >> .env
echo "SLACK_BOT_TOKEN=$SLACK_BOT_TOKEN" >> .env
echo "SLACK_APP_TOKEN=$SLACK_APP_TOKEN" >> .env
echo "TEMPORAL_CLOUD_NAMESPACE=$TEMPORAL_CLOUD_NAMESPACE" >> .env
echo "TEMPORAL_CLOUD_ADDRESS=$TEMPORAL_CLOUD_ADDRESS" >> .env
echo "TEMPORAL_CLOUD_PEM=\"$TEMPORAL_CLOUD_PEM\"" >> .env
echo "TEMPORAL_CLOUD_PRIVATE_KEY=\"$TEMPORAL_CLOUD_PRIVATE_KEY\"" >> .env

npm install

pm2 start ./slack_bot.js
sleep 1
pm2 save

echo "The repository has been cloned, .env files have been created successfully, and processes have been started."
Run the script with ./<your-script>.sh.
Conclusion
You now have a TypeScript-based Temporal Application and Slack bot running on a DigitalOcean Droplet using Temporal Cloud as your Temporal Application's orchestrator.
What's next?
Build a Background Check application
Learn Temporal's core concepts while building a Background Check application from project setup through durable execution.
Start the series TutorialBuild a recurring billing subscription system
Implement a subscription application using Workflows, Activities, Signals, and Queries.
Start the tutorialGet notified when we launch new educational content
New courses, tutorials, and learning resources - straight to your inbox.